
Every day, our kitchens throw out a little treasure.
Vegetable peels. Fruit scraps. Used tea leaves. Most of it goes straight into the dustbin and ends up in a landfill. But here’s a secret every gardener eventually discovers: that “waste” is actually free plant food.
With a little patience, kitchen waste turns into compost: dark, crumbly, earthy-smelling soil that plants absolutely love. Gardeners call it “black gold.”
In this post, I’ll share how I compost at home using a khamba, the mistakes I made at the start, and how I finally got it right.
Why Compost at Home?
Before we begin, here’s why composting is worth it:
- Free, natural plant food. Compost feeds your plants slowly and keeps the soil healthy, so you need far fewer store-bought fertilizers.
- Better soil. It makes soil soft and crumbly, holds water better, and brings in tiny helpful organisms.
- Less waste. A big part of our household waste is kitchen scraps. Composting keeps it out of landfills.
- It’s satisfying! There’s a special joy in seeing yesterday’s peels become tomorrow’s tomatoes.
Remember the 1 + 1 + 1 soil mix from my post on the right soil mix for your terrace garden? One of those three parts is compost. Making your own means you always have it ready.
My Composter: The Khamba 🏺
I use a khamba, a set of three terracotta pots stacked on top of each other, with a lid on top. It’s one of the most popular home composters in Indian cities, and it’s perfect for terraces and balconies.
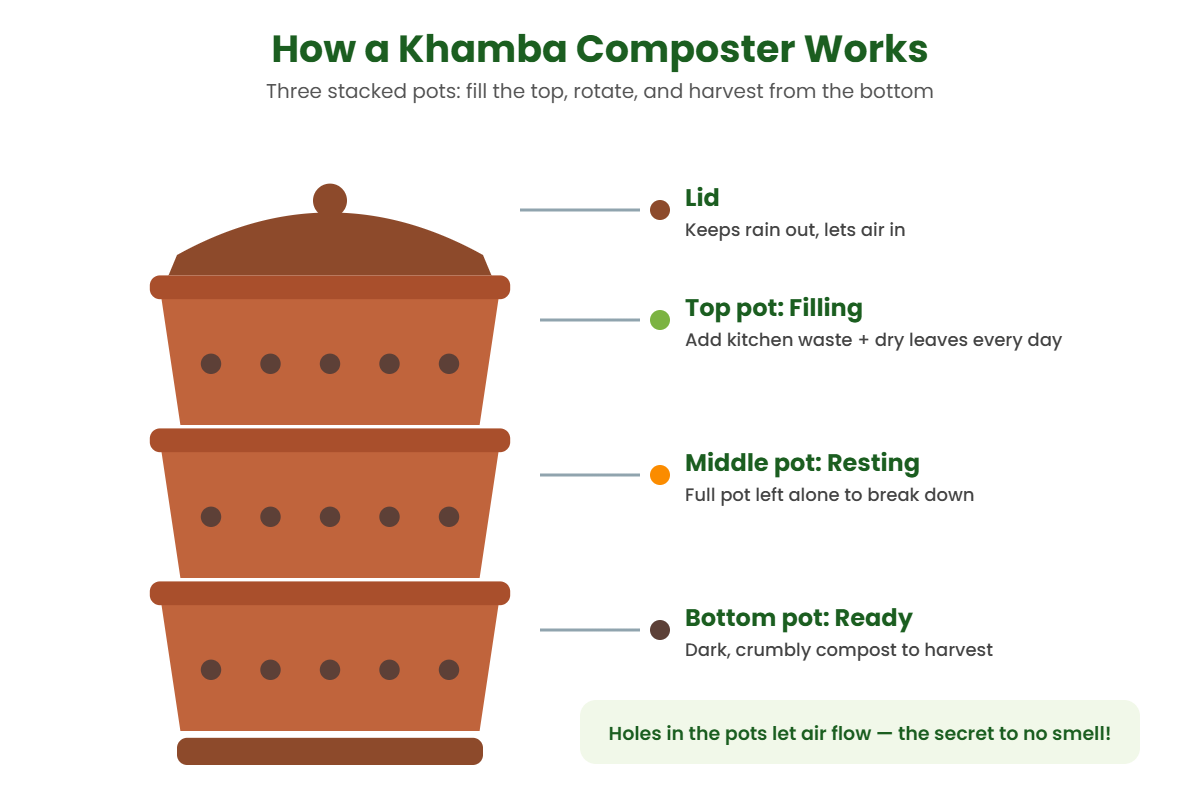
Here’s how it works:
- Top pot (filling): This is where you add your kitchen waste every day, covered with dry leaves.
- Middle pot (resting): When the top pot is full, it moves down. It rests here while the waste slowly breaks down.
- Bottom pot (ready): By the time a pot reaches the bottom, it’s full of ready compost.
The pots have small holes on the sides, and that turns out to be the most important part, as you’ll see in my story below.
What I Put Into My Khamba 🥕🍂
I add all my raw kitchen waste, such as vegetable peels, fruit scraps and tea leaves, along with dry leaves and green leaves from my garden. I never add cooked food.
The secret to good compost is mixing two kinds of material:
- Greens are wet, fresh things: vegetable and fruit peels, tea leaves, fresh green leaves, and old flowers. They bring moisture and nitrogen.
- Browns are dry things: dry leaves, shredded paper, cardboard, and cocopeat. They bring air and carbon, and they soak up extra moisture.
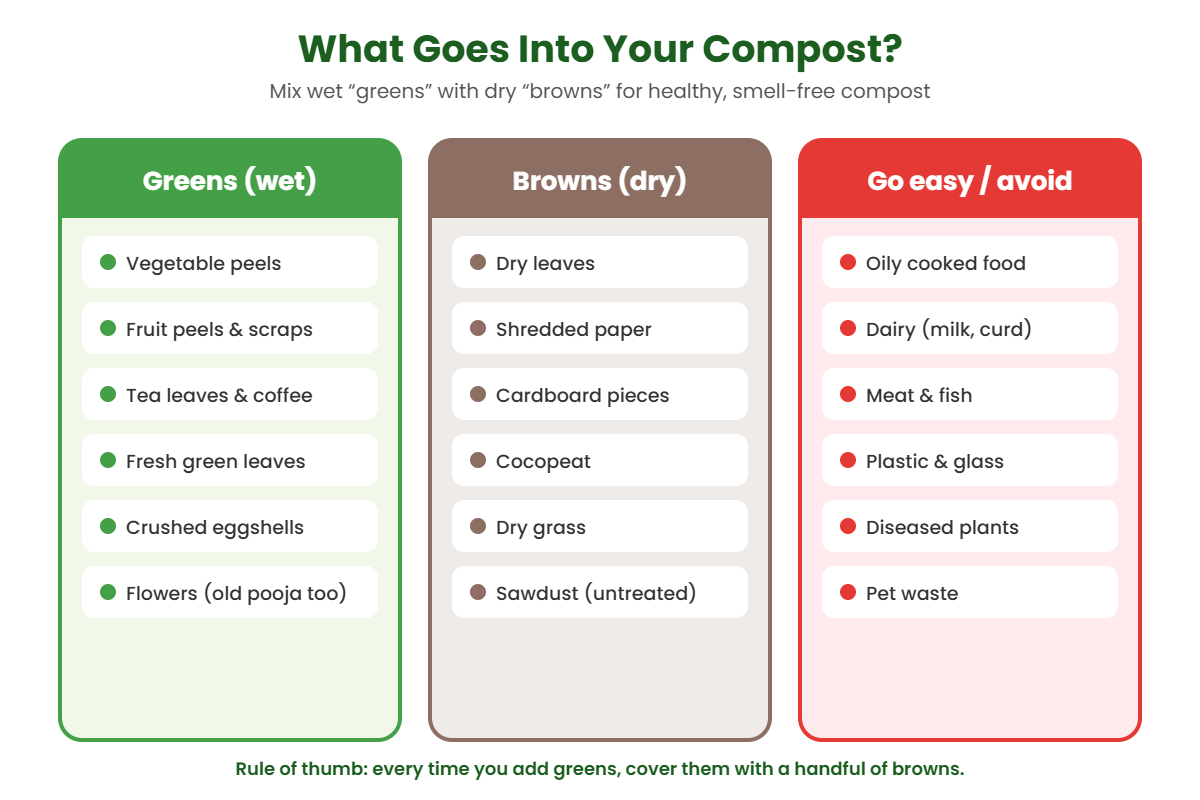
Easy rule: Every time you add a layer of wet greens, cover it with a handful of dry browns.
Why I don’t add cooked food: Oily cooked food, dairy, meat and fish break down slowly, and they’re the most likely to cause bad smells and attract maggots. Keeping them out makes home composting much easier, especially for beginners. Stick to raw scraps, and your khamba will thank you.
My Struggles: Smell, Maggots and Fruit Flies 😣
I’ll be honest. My composting journey didn’t start smoothly.
At first, my khamba gave off a bad smell. Then I found maggots wriggling in the waste. And fruit flies started buzzing around every time I opened the lid. It was not the “black gold” experience I had imagined!
Many beginners give up at this stage. But these problems all have the same cause: the compost was too wet, and it wasn’t getting enough air.
How I Fixed It: Air and Sunlight 🌬️☀️
Two simple changes solved my problems:
1. Proper air circulation
Compost needs to breathe. The good microbes that break down waste need air. Without it, the waste starts to rot instead of composting, and that’s what causes the bad smell. I made sure air could flow freely through the khamba’s side holes, and kept the waste loose instead of packed down.
2. Proper sunlight
I placed my khamba where it gets good sunlight. The warmth helps the compost dry out a little, speeds up the breakdown, and makes the khamba much less welcoming for maggots and flies.
Once the khamba had good air and sunlight, the smell went away, the maggots and fruit flies disappeared, and my compost finally started working the way it should.
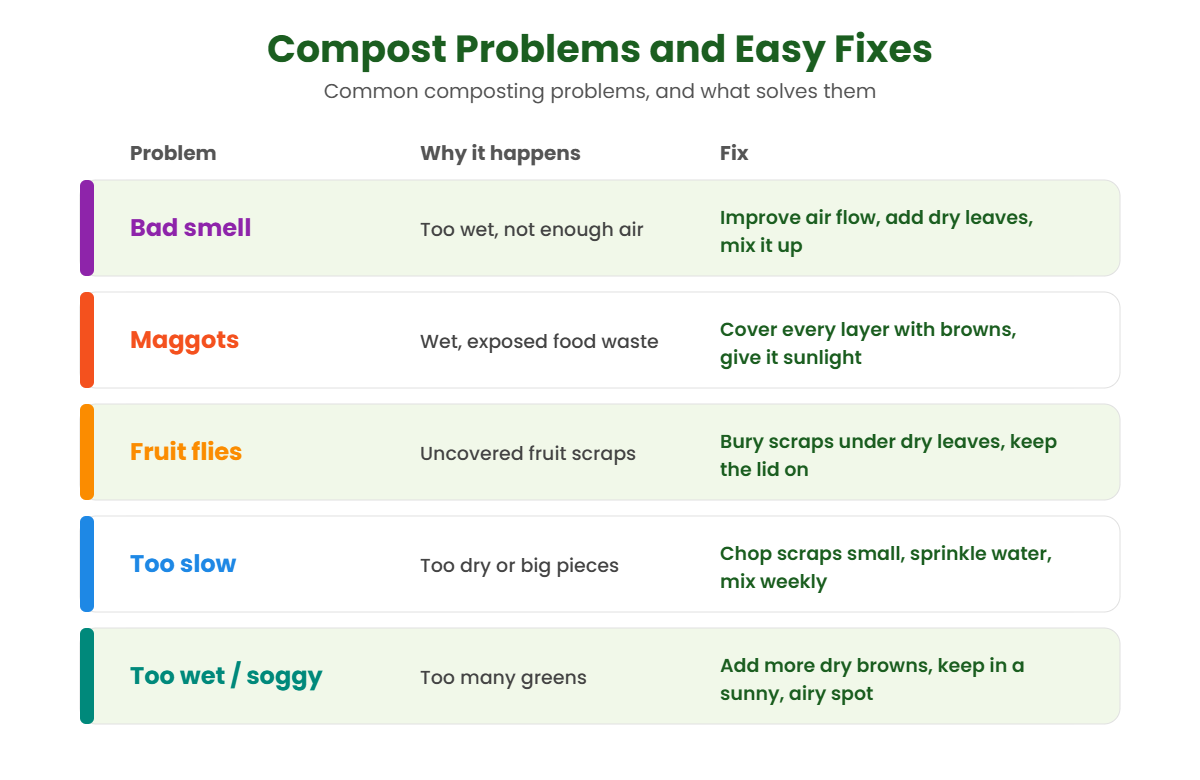
A few more tips:
- Always cover fresh waste with dry leaves. Exposed food attracts flies.
- Chop big scraps into smaller pieces. They break down faster.
- Mix the top layer every few days to let air in.
- Squeeze test: A handful of compost should feel like a squeezed sponge, damp but not dripping. Too wet? Add more dry leaves. Too dry? Sprinkle a little water.
How Long Does It Take? ⏳
For me, it takes about 90 days, roughly three months, from fresh kitchen waste to ready compost.
Your time may be a little faster or slower, depending on the weather, the size of your scraps, and the balance of greens and browns. Warm weather generally speeds things up.
How do you know it’s ready? Ready compost is:
- dark brown or black,
- crumbly, like soft soil,
- and it smells earthy, like the ground after rain, not sour or rotten.
You shouldn’t be able to recognise the original peels and scraps anymore.
How to Use Your Compost 🌱
Once it’s ready, your black gold can go almost anywhere in the garden:
- In your soil mix: Use it as one part of the 1 + 1 + 1 mix for new pots.
- As a top-up: Sprinkle a layer on top of the soil in your existing pots every few weeks.
- To recharge old soil: Mix it into used potting soil before replanting.
- As compost tea: Soak a handful in a bucket of water overnight, and use the liquid to feed your plants.
To learn which nutrients compost gives your plants at each stage, read my NPK Feeding Timeline.
Quick Questions
Why does my compost smell bad?
Usually it’s too wet and not getting enough air. Add dry leaves, loosen the waste, and keep the composter in an airy, sunny spot.
Are maggots in compost harmful?
They’re not dangerous, but they’re a sign that food waste is too wet or exposed. Cover every layer with dry browns, and give the composter more sunlight and air.
Can I compost on a balcony or in a flat?
Yes! A khamba or a small bin works well on a balcony or terrace. With the right balance and good air flow, it shouldn’t smell.
From Waste to Wonder
When I think about it, composting is one of the most magical things in gardening. Yesterday’s peels and fallen leaves become the food that grows tomorrow’s vegetables and flowers. Nothing is wasted. Everything returns to the soil.
Yes, I faced smells, maggots and fruit flies at the start. But a little air and sunlight changed everything. So if your first try doesn’t go perfectly, don’t give up. Adjust, be patient, and in about 90 days, you’ll have your own black gold.
In the next post, we’ll put that compost to good use with growing flowering plants.
Do you compost at home? What method do you use? Tell me in the comments! And watch my terrace garden on YouTube and Instagram.